
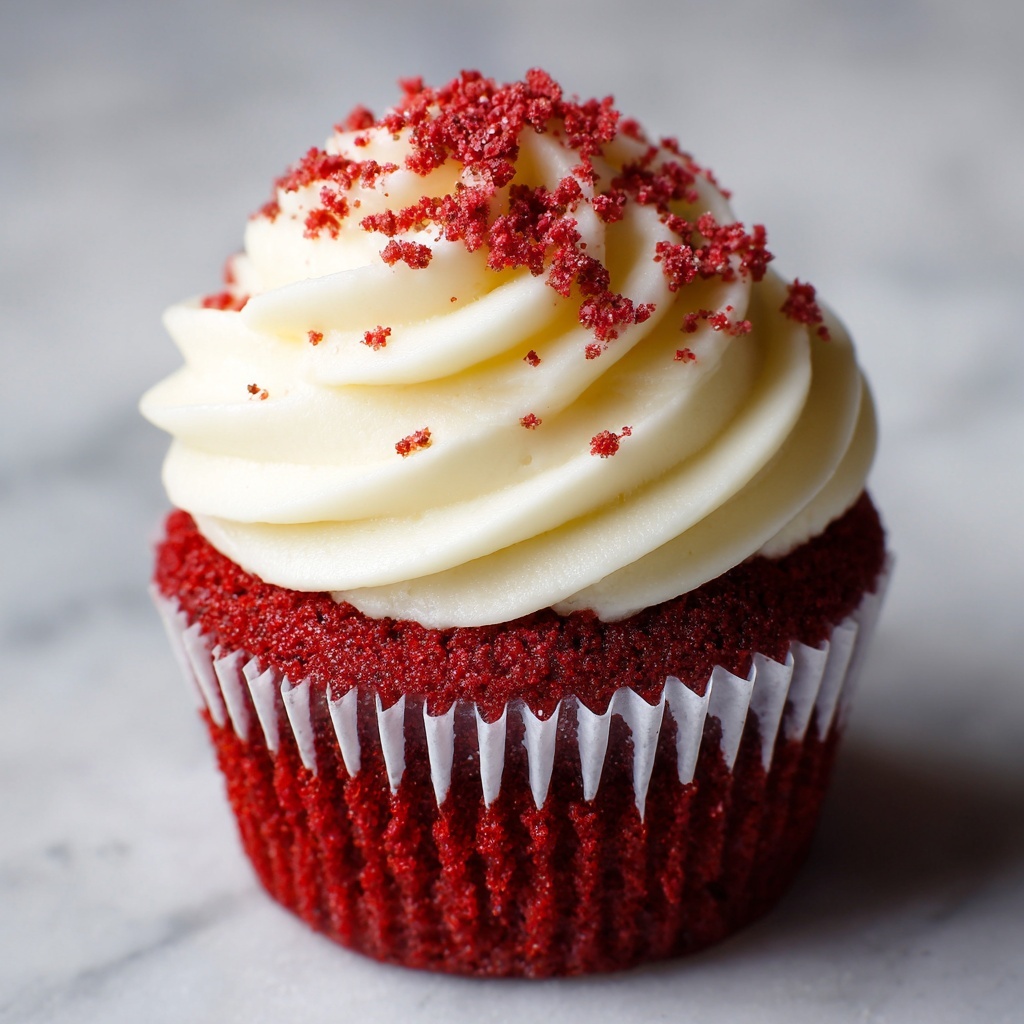
If you’ve been searching for a charming, delightful dessert that brings a burst of color and flavor to any occasion, then you must try this Red Velvet Cookie Cups with Cream Cheese Frosting Recipe. These little beauties combine the rich, velvety texture of classic red velvet with the convenience and fun of bite-sized cookie cups, topped generously with luscious cream cheese frosting. They’re perfect for sharing with friends, gifting, or treating yourself to a comforting and festive sweet. Trust me, once you make these, they’ll become a favorite in your baking repertoire!
Ingredients You’ll Need
Gathering the ingredients is both simple and rewarding. Each item plays a crucial role in delivering that iconic red velvet flavor and perfect cookie cup texture, while the frosting adds a creamy contrast that will have everyone coming back for more.
- 1 1/2 cups all-purpose flour: The sturdy foundation that gives structure to these cookie cups.
- 1 tbsp cocoa powder: Adds the subtle chocolate undertone that makes red velvet so special.
- 1/2 tsp baking soda: Helps the cookies rise just right and keep a light texture.
- 1/4 tsp salt: Balances sweetness and enhances overall flavor.
- 1/2 cup unsalted butter, softened: Gives richness and tenderness to the dough.
- 1 cup granulated sugar: Sweetens and creates that delightful cookie chewiness.
- 1 large egg: Binds ingredients and adds moisture for soft cookies.
- 1 tsp vanilla extract: Deepens the flavor with warm aromatic notes.
- 2 tbsp buttermilk: Adds acidity and keeps the dough tender and moist.
- 2 tbsp red food coloring: Creates that unmistakable vibrant red hue that everyone loves.
- 1/2 tsp white vinegar: Reacts with baking soda for lift and enhances red velvet’s signature tang.
- 8 oz cream cheese, softened: The star ingredient in the frosting, creamy and slightly tangy.
- 1/4 cup unsalted butter, softened: Makes the frosting silky and smooth.
- 2 cups powdered sugar: Sweetens the frosting to perfection without graininess.
- 1 tsp vanilla extract: Adds a sweet fragrance to the frostings’ rich creaminess.
- Pinch of salt: Balances sweetness in the frosting for that irresistible taste.
How to Make Red Velvet Cookie Cups with Cream Cheese Frosting Recipe
Step 1: Preheat the Oven
Start by heating your oven to 350°F (175°C) to ensure it’s ready when your cookie dough is set. Preparing a mini muffin tin by greasing it or lining with cupcake liners will help the cookie cups release easily once baked.
Step 2: Make the Cookie Dough
In a medium bowl, whisk together the flour, cocoa powder, baking soda, and salt—this dry mix is essential for the perfect texture. In a larger bowl, cream the softened butter and granulated sugar until the mixture is light and fluffy; this step introduces air for a tender crumb. Then add the egg, vanilla extract, and red food coloring, mixing everything until fully combined. Pour in the buttermilk and vinegar to create that distinct red velvet tang before gradually folding the dry ingredients in, careful not to overmix.
Step 3: Shape the Cookie Cups
Use a tablespoon to scoop cookie dough into each muffin cup, gently pressing the dough to form a cup shape. This step is where your cookie cups begin to take form. Bake for 8 to 10 minutes, or until a toothpick inserted into the center comes out clean. Let them cool in the tin for a few minutes before transferring to a wire rack to cool completely, so they firm up without breaking.
Step 4: Make the Cream Cheese Frosting
Combine the softened cream cheese and butter in a mixing bowl, beating until the mixture is perfectly smooth and creamy. Slowly add powdered sugar, vanilla extract, and a pinch of salt, continuing to beat until the frosting is fluffy and luscious—this creamy topping is what makes these cookie cups shine.
Step 5: Assemble the Cookie Cups
Once the cookie cups are completely cool, use a piping bag or spoon to generously frost each one with the cream cheese frosting. This is your chance to get creative—decorate with sprinkles, extra crumbs of red velvet cookie dough, or keep it simple and elegant.
How to Serve Red Velvet Cookie Cups with Cream Cheese Frosting Recipe

Garnishes
Add a personal touch by garnishing the cookie cups with festive sprinkles, mini chocolate chips, or a light dusting of cocoa powder. These little decorations don’t just enhance the appearance—they also add texture and extra flavor contrast to your dessert.
Side Dishes
Serve your cookie cups alongside a steaming cup of coffee, a rich hot chocolate, or a cold glass of milk. These beverages perfectly complement the creamy frosting and tender cookie base, turning any snack time into a special occasion.
Creative Ways to Present
Consider arranging your Red Velvet Cookie Cups with Cream Cheese Frosting Recipe on a pretty tiered dessert stand at parties, or pack them individually in clear boxes tied with ribbons for sweet gifts. You could also pair a few cookie cups with fresh fruit for a refreshing dessert plate that’s sure to impress.
Make Ahead and Storage
Storing Leftovers
Keep any leftover cookie cups in an airtight container and refrigerate them for up to three days. This helps the cream cheese frosting stay fresh and the cookies maintain their perfect texture without drying out.
Freezing
If you want to save these treats for later, freeze unfrosted cookie cups in a single layer on a baking sheet. Once frozen, transfer them to a freezer-safe container or bag for up to three months. When ready to serve, thaw completely, then add fresh cream cheese frosting for that just-made experience.
Reheating
Warm cookie cups gently in a low oven (around 300°F) for a few minutes if you want a soft, freshly baked feel. Avoid reheating the frosting; instead, add a fresh layer on top after warming to keep the frosting creamy and fresh.
FAQs
Can I make the cream cheese frosting ahead of time?
Absolutely! You can prepare the frosting a day in advance. Store it tightly covered in the refrigerator and bring it to room temperature before spreading to maintain that perfect creamy texture.
Can I substitute the red food coloring with natural alternatives?
Yes, natural alternatives like beet juice or powdered freeze-dried strawberries can give a lovely red tint, though the shade might vary slightly and the flavor will get a subtle fruity note.
Are these cookie cups gluten-free?
The recipe as written is not gluten-free. However, you can experiment by swapping the all-purpose flour with a gluten-free baking mix, but results may vary and might require some adjustments.
Can I use regular milk instead of buttermilk?
You can substitute buttermilk with regular milk mixed with 1 tablespoon of vinegar or lemon juice to mimic buttermilk’s acidity and maintain the texture and tang of the cookie cups.
How long will these cookie cups last at room temperature?
Because of the cream cheese frosting, it’s best to keep these cookie cups refrigerated and enjoy within three days for safety and freshness. At room temperature, they shouldn’t be left out for more than two hours.
Final Thoughts
Making this Red Velvet Cookie Cups with Cream Cheese Frosting Recipe is such a joyful experience—whether you’re baking for a special event or an everyday treat. The bright red color, soft cookie texture, and creamy frosting all come together in a package that feels both festive and comforting. I can’t wait for you to enjoy these little treasures as much as I do! Happy baking!
Print
Red Velvet Cookie Cups with Cream Cheese Frosting Recipe
- Prep Time: 10 minutes
- Cook Time: 10 minutes
- Total Time: 25 minutes
- Yield: 12 servings
- Category: Dessert
- Method: Baking
- Cuisine: American
Description
These Red Velvet Cookie Cups with Cream Cheese Frosting combine the rich, slightly chocolatey flavor of red velvet with a soft, creamy cream cheese topping. Perfect as a festive treat or dessert, the cookie cups are baked in mini muffin tins for individual servings and topped with a luscious, fluffy cream cheese frosting that melts in your mouth.
Ingredients
Cookie Dough
- 1 1/2 cups all-purpose flour
- 1 tbsp cocoa powder
- 1/2 tsp baking soda
- 1/4 tsp salt
- 1/2 cup unsalted butter, softened
- 1 cup granulated sugar
- 1 large egg
- 1 tsp vanilla extract
- 2 tbsp buttermilk
- 2 tbsp red food coloring
- 1/2 tsp white vinegar
Cream Cheese Frosting
- 8 oz cream cheese, softened
- 1/4 cup unsalted butter, softened
- 2 cups powdered sugar
- 1 tsp vanilla extract
- Pinch of salt
Instructions
- Preheat the Oven: Preheat your oven to 350°F (175°C). Grease a mini muffin tin or line it with cupcake liners to prepare for baking.
- Make the Cookie Dough: In a medium bowl, whisk together the flour, cocoa powder, baking soda, and salt. In a separate large mixing bowl, beat the softened butter and granulated sugar together until light and fluffy, about 2-3 minutes. Add in the egg, vanilla extract, and red food coloring, mixing until well combined. Stir in the buttermilk and white vinegar. Gradually add the dry ingredients to the wet mixture, mixing just until combined to avoid overmixing.
- Shape the Cookie Cups: Using about 1 tablespoon of dough per muffin cup, scoop the dough into the prepared mini muffin tin, pressing it gently down to shape the cups. This helps create a slight indentation for the frosting later. Bake for 8-10 minutes, or until a toothpick inserted into the center comes out clean. Let the cookies cool in the tin for 5 minutes, then transfer them to a wire rack to cool completely.
- Make the Cream Cheese Frosting: In a large mixing bowl, beat together the softened cream cheese and butter until smooth and creamy. Add the powdered sugar gradually, along with the vanilla extract and a pinch of salt. Continue beating the mixture for 3-4 minutes until it becomes fluffy and spreadable.
- Assemble the Cookie Cups: Once the cookie cups have cooled fully, use a piping bag or spoon to generously pipe or spread the cream cheese frosting onto each cup. For extra decoration, consider adding sprinkles or red velvet crumbs on top. Serve immediately or store in an airtight container in the refrigerator for up to 3 days.
Notes
- Allow the cookie cups to cool completely before frosting to prevent the frosting from melting.
- You can substitute buttermilk with regular milk mixed with a teaspoon of vinegar if unavailable.
- For a more intense red color, adjust the amount of red food coloring to your preference.
- Store leftover cookie cups refrigerated and bring to room temperature before serving for best texture.
- Use cupcake liners for easy removal and presentation or grease the tin well if skipping liners.


