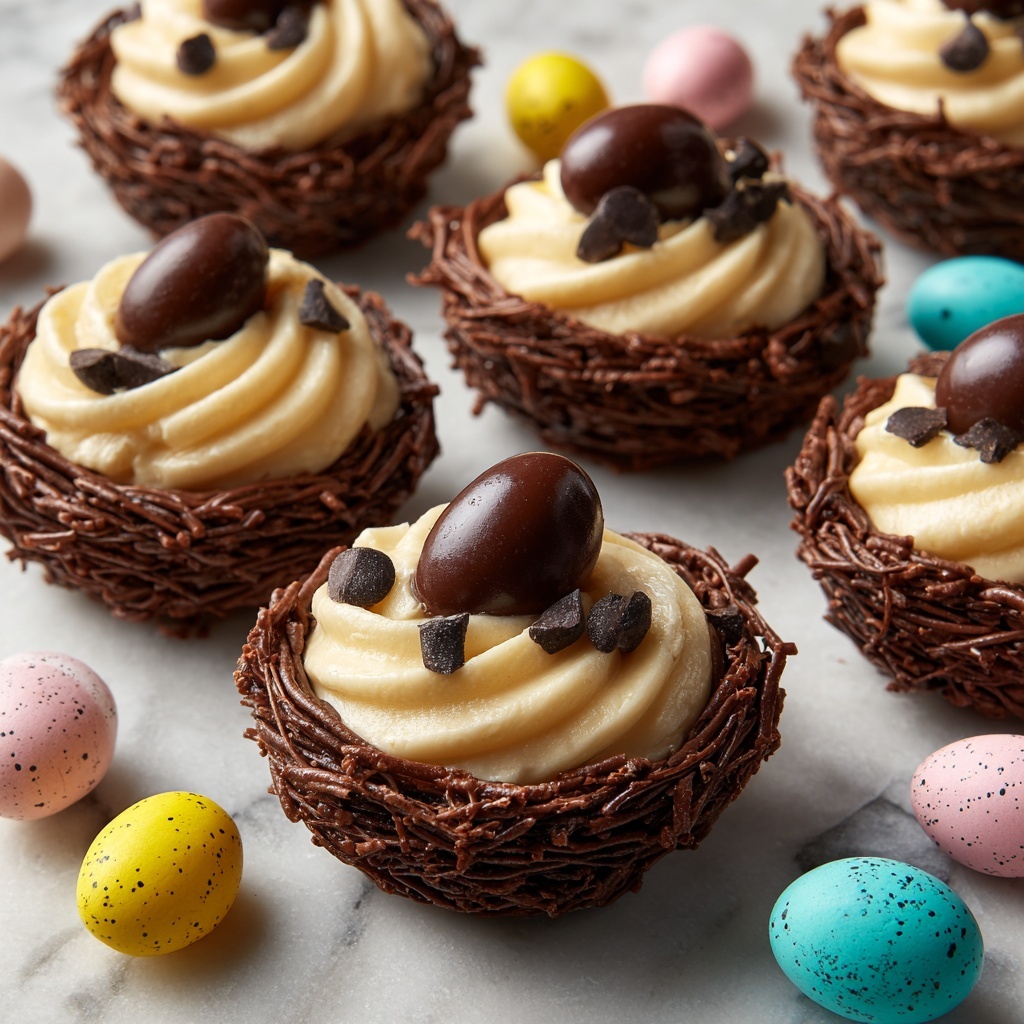
The Chocolate Meringue Easter Nests Recipe is an absolute delight that perfectly captures the spirit of spring and renewal with every crunchy, chocolaty bite. These delicate nests are made from light and airy meringue, carefully shaped and baked to a crisp, then artistically drizzled with rich melted chocolate and filled with colorful candy eggs that add playful pops of sweetness and color. Whether you’re baking for a family gathering or simply want to add a bit of festive fun to your holiday table, this recipe is guaranteed to charm kids and adults alike with its delightful texture and joyful presentation.

Ingredients You’ll Need
This recipe shines because it uses simple, classic ingredients that transform into something magical. Each component plays a crucial role in creating the perfect balance of texture, flavor, and visual appeal in your Easter nests.
- Egg whites: The foundation for those crisp, airy nests that will hold their shape beautifully.
- Cream of tartar: Helps stabilize the egg whites for a sturdier meringue that won’t collapse.
- Granulated sugar: Sweetens the meringue and adds that glossy, stiff peak texture.
- Vanilla extract: Adds a subtle warmth that complements the chocolate and candy eggs perfectly.
- Chocolate chips: Melted to create a luscious drizzle that binds the nests with rich flavor.
- Butter: Added to the melted chocolate for smoothness and richness.
- Candy eggs (mini chocolate eggs or jelly beans): The colorful, festive finishing touch that brings the nests to life.
- Pinch of salt: Enhances all the flavors and balances the sweetness.
How to Make Chocolate Meringue Easter Nests Recipe
Step 1: Preheat and Prepare
Start by preheating your oven to 250°F (120°C). Line a baking sheet with parchment paper or a silicone baking mat, ensuring your nests won’t stick and can be removed easily after baking. This gentle low heat is key to drying out the meringue steadily without browning.
Step 2: Whip the Meringue
In a large, spotless bowl, beat the egg whites with a pinch of salt and cream of tartar on medium speed until soft peaks form. This is the stage where your meringue starts to take on volume and shine, so timing and technique matter. Gradually add your granulated sugar, one tablespoon at a time, then continue beating until stiff and glossy peaks form. Finish by folding in vanilla extract for that signature flavor.
Step 3: Shape Your Nests
Now for the fun part: sculpting your nests! Use a spoon or piping bag to dollop or pipe mounds of meringue onto your baking sheet. Gently create a little well in the center of each mound—this is where your candy eggs will nestle later. Think delicate bird’s nests, light and inviting.
Step 4: Bake to Perfection
Pop those nests into the preheated oven and bake for 1 to 1 1/2 hours. Patience is key because they need to dry out fully and become pleasantly firm to the touch. Once done, turn off the oven but leave the nests inside to cool slowly for about an hour. This step helps prevent any cracks, keeping your nests beautiful and intact.
Step 5: Prepare the Chocolate Drizzle
While the meringues cool, melt your chocolate chips with butter in a microwave-safe bowl. Heat in short bursts of 20 to 30 seconds, stirring well after each, until silky smooth. This luscious chocolate drizzle will add richness and a touch of indulgence that makes these nests irresistible.
Step 6: Assemble Your Chocolate Meringue Easter Nests Recipe
Once your nests are completely cooled, artfully drizzle the melted chocolate over them. Then, fill the centers with your favorite colorful candy eggs—mini chocolate eggs or vibrant jelly beans add that playful, festive flair. This assembly step injects personality and charm into each little nest.
Step 7: Let the Chocolate Set
Allow the chocolate to firm up slightly before serving to ensure every bite stays tidy and delicious. This moment gives you time to admire your handiwork and get ready for compliments!
How to Serve Chocolate Meringue Easter Nests Recipe

Garnishes
For an extra special touch, try sprinkling a little edible glitter or finely chopped pistachios on the chocolate drizzle before it sets. This adds sparkle and a subtle nutty crunch that complements the sweet and airy meringue beautifully.
Side Dishes
These nests are most delicious as a light dessert or snack on their own, but pairing them with a simple bowl of fresh berries or a dollop of whipped cream can elevate the experience, balancing sweetness with fresh, tangy notes.
Creative Ways to Present
Present your Chocolate Meringue Easter Nests Recipe in pastel-colored cupcake liners for a charming, individual touch. Alternatively, arrange them on a rustic wooden platter surrounded by sprigs of fresh spring flowers for a stunning centerpiece at your Easter brunch.
Make Ahead and Storage
Storing Leftovers
You can store any leftover meringue nests in an airtight container at room temperature for up to 3 days. Make sure they are completely cool and dry before sealing to keep that perfect crispness intact.
Freezing
To keep your Easter nests fresh longer, freeze them in a single layer on a baking sheet until solid, then transfer to a sealed container or freezer bag. They’ll keep well for up to a month and can be enjoyed straight from the freezer or thawed gently.
Reheating
Since meringues are best served crisp, avoid reheating. If they lose crunch after storage or freezing, you can gently warm them in a low oven (about 200°F / 90°C) for 5-10 minutes to restore texture, but freshly made is always best.
FAQs
Can I use other types of chocolate in the drizzle?
Absolutely! Dark, milk, or white chocolate all work wonderfully. Just be sure to melt them gently to maintain a smooth drizzle. Each brings a distinct flavor that can customize your nests to your preference.
What if I don’t have cream of tartar?
You can skip it if needed, but cream of tartar helps stabilize the egg whites for a stronger meringue. Alternatively, a few drops of lemon juice or white vinegar offer a similar effect.
Are these nests gluten-free?
Yes! This recipe is naturally gluten-free since it uses egg whites, sugar, and chocolate. Just double-check your candy eggs to ensure they don’t contain gluten ingredients if that’s a concern.
Can kids help make this recipe?
Definitely! Kids will love shaping the nests and adding candy eggs. Just supervise the egg-white whipping and oven use to keep things safe and fun.
How long does it take for the chocolate to set?
At room temperature, the chocolate should start to firm up within 15 to 20 minutes. If you’re in a hurry, a brief chill in the refrigerator can speed the process to about 5-10 minutes.
Final Thoughts
The Chocolate Meringue Easter Nests Recipe is a charming, tasty way to celebrate the season with a dessert that feels as fresh and joyful as spring itself. It’s light, fun, and perfectly festive — so go ahead and give it a try for your next holiday gathering. I promise it will bring smiles and sweet memories to your table!
Print
Chocolate Meringue Easter Nests Recipe
- Prep Time: 30 minutes
- Cook Time: 1 hour 30 minutes
- Total Time: 2 hours
- Yield: 12 servings
- Category: Dessert
- Method: Baking
- Cuisine: American
Description
These Chocolate Meringue Easter Nests are a delightful festive treat perfect for Easter celebrations. Light and crispy meringue nests are baked to perfection, then drizzled with rich melted chocolate and filled with colorful candy eggs, offering a fun and crunchy texture with a touch of sweetness that appeals to both kids and adults.
Ingredients
Meringue
- 4 large egg whites
- Pinch of salt
- 1/4 teaspoon cream of tartar
- 1 cup granulated sugar
- 1 teaspoon vanilla extract
Chocolate Drizzle
- 1/2 cup chocolate chips
- 1 tablespoon unsalted butter
Decoration
- Colorful candy eggs (mini chocolate eggs, jelly beans, or similar), quantity as desired for filling nests
Instructions
- Preheat the Oven: Preheat your oven to 250°F (120°C). Line a baking sheet with parchment paper or a silicone baking mat to prepare for baking the meringue nests.
- Prepare the Meringue: In a large, clean bowl, beat the egg whites with a pinch of salt and cream of tartar using an electric mixer on medium speed until soft peaks form. Gradually add the granulated sugar, one tablespoon at a time, continuing to beat until the meringue is thick, glossy, and forms stiff peaks. Add vanilla extract and mix to combine.
- Shape the Nests: Using a spoon or a piping bag, scoop or pipe the meringue onto the prepared baking sheet in small nest shapes. Create a shallow well in the center of each mound to resemble a bird’s nest for holding the candy.
- Bake the Meringues: Bake the nests in the preheated oven for 1 to 1 1/2 hours until they are firm to the touch and can be lifted easily from the parchment. After baking, turn off the oven and allow the meringues to cool inside for about an hour to prevent cracking.
- Prepare the Chocolate Drizzle: While the meringues cool, melt the chocolate chips and butter together in a microwave-safe bowl in 20-30 second increments. Stir thoroughly between intervals until the mixture is smooth and fully melted.
- Assemble the Nests: Once the meringue nests have completely cooled, drizzle the melted chocolate over them. Then fill the centers with your choice of colorful candy eggs, such as mini chocolate eggs or jelly beans.
- Let the Chocolate Set: Allow the chocolate drizzle to harden slightly before serving to ensure the nests hold their shape and look attractive.
Notes
- Ensure the mixing bowl and beaters are completely clean and free from grease for the egg whites to whip properly.
- Do not open the oven door during baking to avoid cracks in the meringues.
- You can substitute the candy eggs with any small colorful candy or edible decorations of your liking.
- Store the finished nests in an airtight container to keep them crisp.
- For a dairy-free version, substitute butter with coconut oil or a dairy-free alternative.


