
If you’ve ever dreamed of biting into a perfectly creamy and chocolatey frozen treat, this Chocolate Ice Cream Bars Recipe is your new best friend in the kitchen. It combines rich cocoa with silky cream and a delightfully crisp chocolate shell that cracks just right with every bite. With a homemade touch that tastes so much better than store-bought, these ice cream bars feel like a personal celebration of dessert, perfect for cooling down or wowing guests with a sweet surprise.
Ingredients You’ll Need
This recipe calls for simple, everyday ingredients that come together beautifully to create something extraordinary. Each element plays a role, from the velvety texture provided by the heavy cream to the deep chocolate flavor of the cocoa powder and melted chocolate coating.
- 2 cups heavy cream: adds a luscious creaminess and smooth texture crucial for rich ice cream.
- 1 cup whole milk: balances the cream’s richness and helps achieve perfect consistency.
- 3/4 cup granulated sugar: sweetens the mixture while dissolving smoothly for an even flavor.
- 1/2 cup unsweetened cocoa powder: delivers intense chocolate flavor with a slight bitterness to balance sweetness.
- 1 teaspoon vanilla extract: enhances all the flavors with its warm, aromatic notes.
- 1/2 teaspoon salt: intensifies sweetness and depth of chocolate by cutting through the richness.
- 8 oz semi-sweet or dark chocolate (chopped): creates the irresistible outer shell when melted and hardened.
- 1 tablespoon coconut oil or neutral oil: ensures the chocolate coating melts smoothly and sets with a perfect snap.
- Optional toppings (chopped nuts, sprinkles, crushed cookies): add texture, color, and extra fun to your bars.
How to Make Chocolate Ice Cream Bars Recipe
Step 1: Prepare the Chocolate Ice Cream Base
Begin by whisking together heavy cream, whole milk, sugar, cocoa powder, vanilla extract, and salt in a large bowl until the mixture is flawlessly smooth and all sugar granules dissolve. This step is crucial for a silky ice cream base with evenly distributed flavors that will freeze perfectly in the next stage.
Step 2: Freeze the Ice Cream Mixture
Pour the luscious mixture into ice cream molds and insert sticks. Pop them into the freezer for at least 6 hours—patience here is a virtue because that is what creates the creamy yet firm texture you’re aiming for. Once solid, carefully remove the bars from the molds; this is easier with silicone molds that gently release without fuss.
Step 3: Melt the Chocolate Coating
Using a microwave or a double boiler, gently melt the chopped semi-sweet chocolate with coconut (or neutral) oil until it becomes glossy and smooth. Let it cool just slightly to avoid melting the ice cream when dipping. This silky coating will harden beautifully and provide a satisfying crunch with every bite.
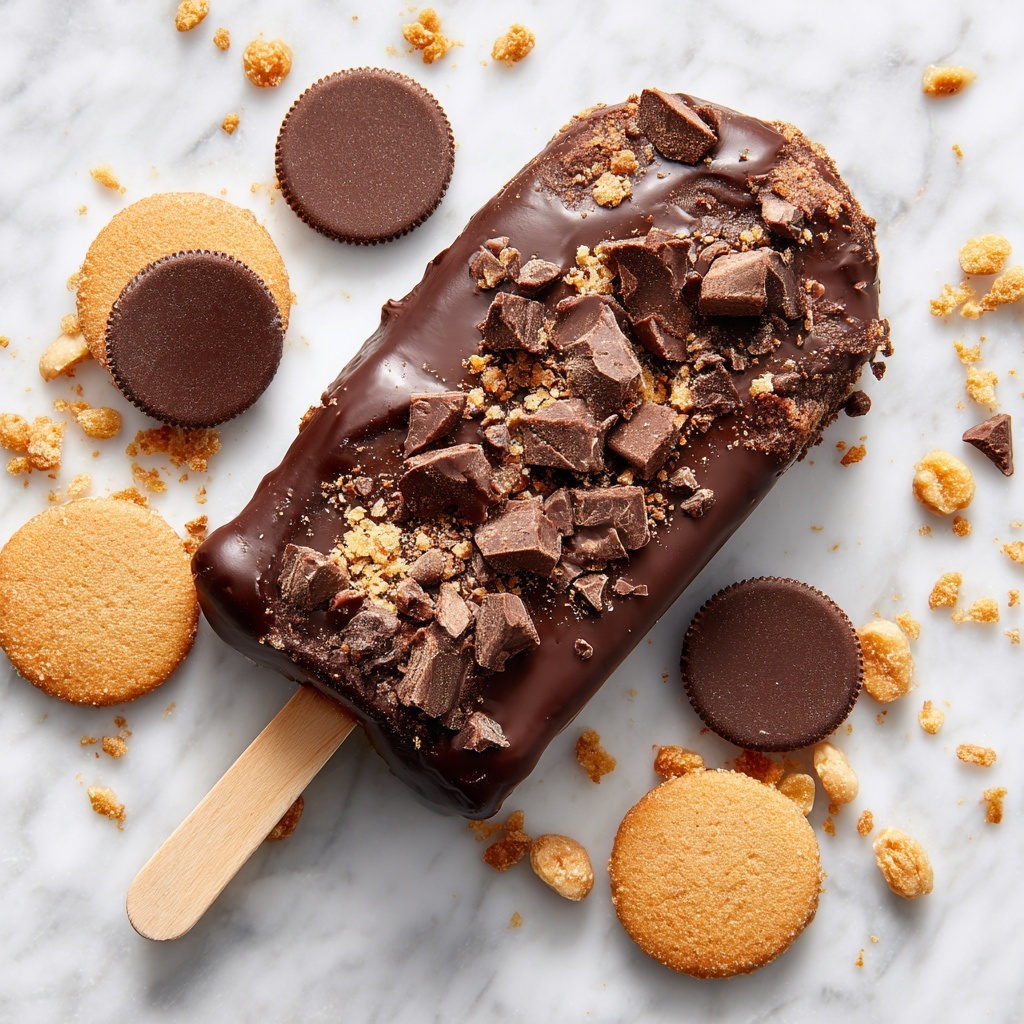
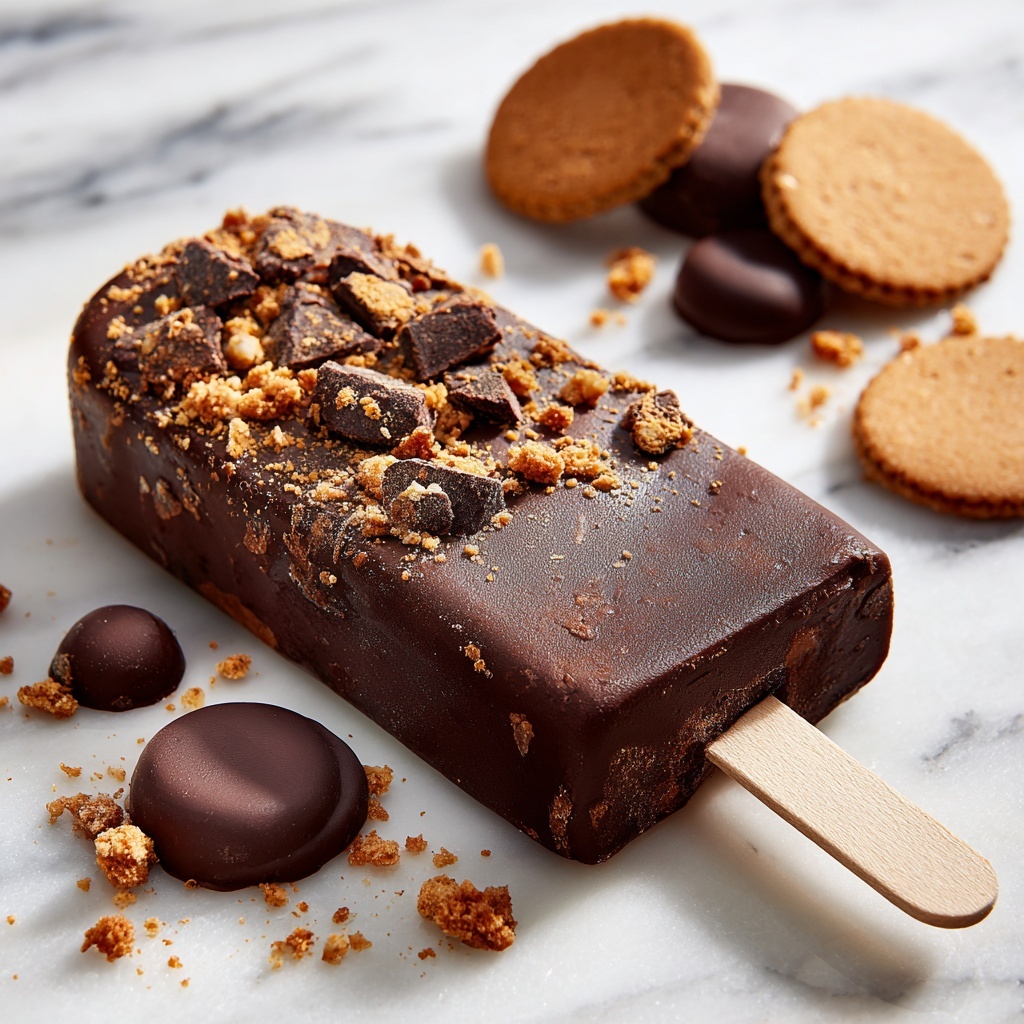
Step 4: Dip and Decorate Your Ice Cream Bars
Quickly dip each frozen bar into the melted chocolate, letting any excess drip off so you don’t get a thick glob of chocolate. Before the coating sets, sprinkle on your favorite toppings if desired — nuts add a lovely crunch, sprinkles bring whimsy, and crushed cookies contribute extra flavor layers. Once dipped, place the bars on parchment paper and return to the freezer for 10 to 15 minutes, allowing the chocolate shell to become firm and crackly.
How to Serve Chocolate Ice Cream Bars Recipe
Garnishes
To serve these bars with that extra wow factor, consider garnishing with a dusting of cocoa powder, a drizzle of caramel sauce, or a sprinkle of sea salt to contrast the sweetness. Fresh mint leaves or delicate edible flowers can also brighten the presentation and add refreshing aroma.
Side Dishes
Although these bars stand out on their own, pairing them with fresh berries or a scoop of vanilla ice cream creates an elegant dessert plate. For adults, a small glass of dessert wine or a rich espresso can enhance the chocolate experience even more.
Creative Ways to Present
Serve your Chocolate Ice Cream Bars Recipe on colorful plates or wooden boards lined with parchment to prevent sticking and add rustic charm. Consider wrapping individual bars in wax paper tied with twine for gift-giving or for a stylish party dessert setup. Vertical arrangements in a decorative jar filled with ice make a fun and practical display too.
Make Ahead and Storage
Storing Leftovers
Store any uneaten bars in an airtight container to avoid freezer odors and prevent ice crystals from forming on the chocolate coating. Keeping them well-sealed ensures they stay fresh and delicious for up to two weeks.
Freezing
Because these bars freeze solidly and well, they are perfect to make in advance. After dipping and decorating, freeze them thoroughly until needed. This convenience lets you invite unexpected guests or prep for a party without stress.
Reheating
Reheating isn’t necessary for frozen chocolate ice cream bars, but if the coating gets too firm, leaving them at room temperature for a few minutes softens the chocolate enough for easier biting while keeping the core cold and creamy.
FAQs
Can I use non-dairy milk for the ice cream base?
Absolutely! Swap out heavy cream and whole milk for full-fat coconut cream and almond or oat milk to make a delicious dairy-free version while maintaining creamy texture and rich flavor.
What type of chocolate works best for the coating?
Semi-sweet or dark chocolate with at least 60% cacao content works wonderfully because it balances sweetness and bitterness, giving that perfect chocolate snap and flavor depth.
Why do I need to add oil to the melted chocolate?
The oil thins out the chocolate slightly, making it easier to dip the bars and ensuring the coating hardens with a smooth, shiny finish. It also helps the shell crack nicely when bitten.
Can I add mix-ins like cookie dough or nuts inside the ice cream?
Yes, mixing in chopped nuts or cookie pieces before freezing adds delightful texture. Just fold them gently into the base mixture before pouring it into molds.
How long will the bars keep in the freezer?
Stored in an airtight container, your chocolate ice cream bars will stay fresh and enjoyable for up to two weeks, retaining their creamy texture and crisp chocolate coating.
Final Thoughts
Now that you have this go-to Chocolate Ice Cream Bars Recipe in your culinary toolkit, you’re ready to impress yourself and anyone lucky enough to share these treats. They’re a saving grace on hot days and a guaranteed crowd-pleaser whenever you feel like indulging. Give it a try—your taste buds will thank you!
Print
Chocolate Ice Cream Bars Recipe
- Prep Time: 15 minutes
- Cook Time: 5 minutes
- Total Time: 6 hours 20 minutes
- Yield: 8 bars
- Category: Dessert
- Method: Freezing
- Cuisine: American
- Diet: Vegetarian
Description
Delicious homemade chocolate ice cream bars made with a creamy blend of heavy cream, milk, and cocoa powder, coated in rich melted chocolate. Perfectly frozen and optionally topped with nuts, sprinkles, or crushed cookies, these bars offer a refreshing and indulgent dessert experience.
Ingredients
Ice Cream Base
- 2 cups heavy cream
- 1 cup whole milk
- 3/4 cup granulated sugar
- 1/2 cup unsweetened cocoa powder
- 1 teaspoon vanilla extract
- 1/2 teaspoon salt
Chocolate Coating
- 8 oz semi-sweet or dark chocolate, chopped
- 1 tablespoon coconut oil or neutral oil (for melting chocolate)
Optional Toppings
- Chopped nuts
- Sprinkles
- Crushed cookies
Instructions
- Prepare the Ice Cream Mixture: In a large bowl, whisk together the heavy cream, whole milk, granulated sugar, unsweetened cocoa powder, vanilla extract, and salt until the mixture is smooth and all the sugar has dissolved.
- Fill the Molds: Pour the prepared mixture into ice cream molds and insert sticks. Make sure the molds are filled evenly.
- Freeze the Bars: Place the molds in the freezer for at least 6 hours or until the ice cream bars are fully set and solid.
- Remove and Prepare for Coating: Once frozen, carefully remove the bars from the molds. Return them to the freezer to keep them firm while you prepare the chocolate coating.
- Melt the Chocolate: In a microwave-safe bowl or using a double boiler, melt the chopped semi-sweet or dark chocolate together with the coconut or neutral oil until the mixture is smooth and glossy. Allow it to cool slightly but remain liquid enough for dipping.
- Dip the Bars: Dip each frozen ice cream bar into the melted chocolate coating, letting any excess chocolate drip off. Quickly sprinkle with any optional toppings such as chopped nuts, sprinkles, or crushed cookies before the chocolate sets.
- Set the Coating: Place the dipped bars on a parchment-lined tray and immediately put them back in the freezer for 10–15 minutes until the chocolate coating hardens completely.
- Serve: Once the coating is firm, serve the chocolate ice cream bars directly from the freezer and enjoy!
Notes
- Use silicone molds for easy removal of the ice cream bars.
- For a dairy-free or vegan version, substitute heavy cream with coconut cream and whole milk with almond milk.
- Store the finished bars in an airtight container in the freezer for up to 2 weeks for best quality.
