
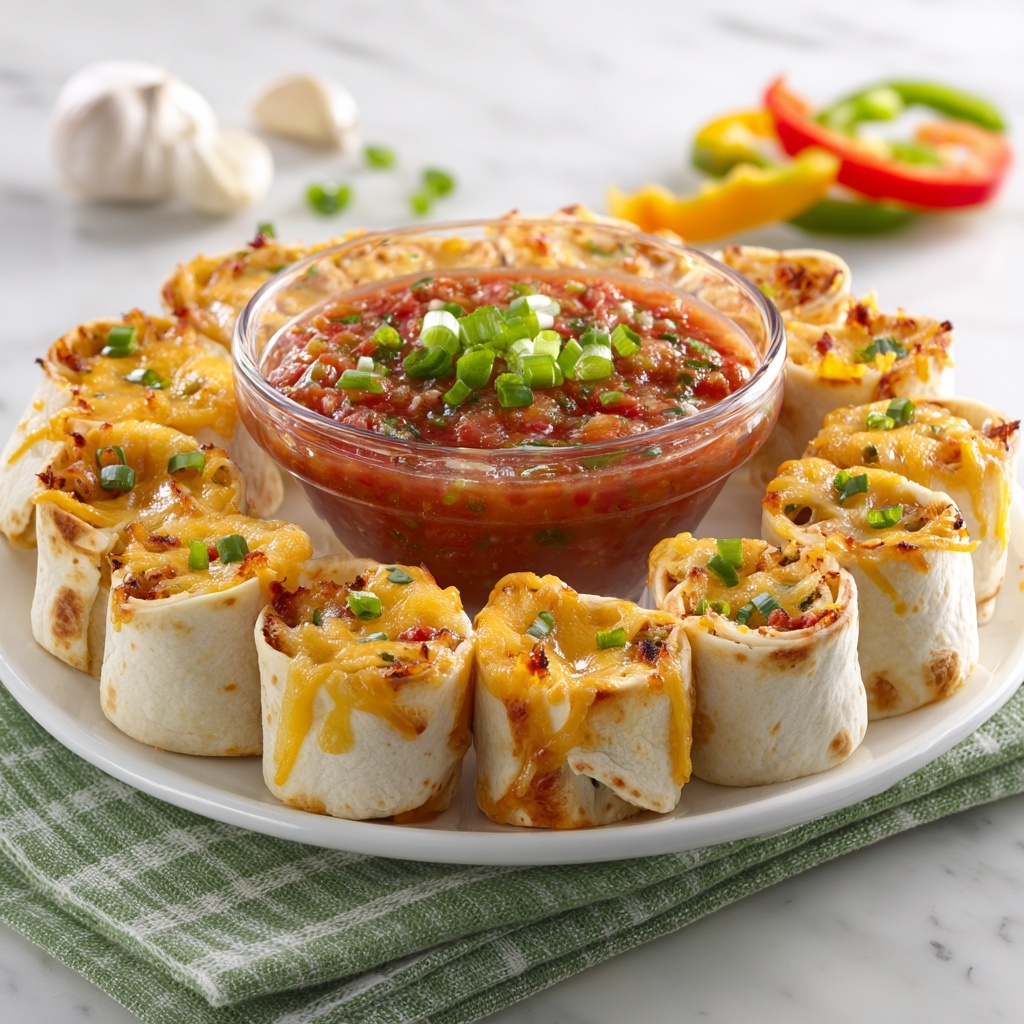
If you’re on the hunt for a crowd-pleasing, show-stopping appetizer that’s bursting with flavor and fun, the Blooming Chicken Quesadilla Ring Recipe is exactly what you need. It takes the classic comfort of cheesy chicken quesadillas and transforms them into a stunning layered ring that literally blooms before your eyes when baked. Imagine tender shredded chicken mixed with creamy cheeses and perfectly sautéed peppers wrapped inside crispy tortilla cones, all arranged in a golden, cheesy ring that’s as delicious to eat as it is to admire. This recipe effortlessly blends vibrant colors, hearty textures, and zestful seasoning, making it an instant party favorite or family dinner winner that everyone will rush to dig into.
Ingredients You’ll Need
Most incredible dishes start with simple, thoughtfully chosen ingredients, and the beauty of this recipe lies in how each component contributes to taste, texture, and color. From the creamy richness of the cheeses to the tangy lime juice and the smoky warmth of taco seasoning, these ingredients build layers of flavor that make the Blooming Chicken Quesadilla Ring Recipe truly unforgettable.
- 2 tablespoons olive oil: Adds a nice caramelized flavor to the sautéed veggies and helps soften them perfectly.
- 1 medium onion (thinly sliced): Brings sweetness and a bit of bite once cooked down to golden perfection.
- 2 bell peppers (sliced): Use a mix of red, yellow, green, or orange for vibrant color and a mild, sweet crunch.
- 8 ounces cream cheese (room temperature): Creates a creamy, dreamy base that binds all the filling ingredients together smoothly.
- ¼ cup sour cream (or plain Greek yogurt): Adds tanginess and a bit of moisture for a luscious filling.
- 1 tbsp lime juice: Brightens up the filling and cuts through the richness with a fresh citrus kick.
- ¼ cup mozzarella cheese (shredded): Melts beautifully and adds gooey stretchiness inside and on top.
- ¼ cup cheddar cheese (shredded): Adds sharp, savory depth and turns golden-brown when baked.
- 1 ½ tbsp taco seasoning: Packs a flavorful punch with warming spices that tie the whole dish together.
- 3 cups cooked chicken (shredded): The hearty superstar protein — rotisserie chicken works perfectly here for both ease and flavor.
- 12 medium flour tortillas (10″–12″): The sturdy yet flexible shells to hold the filling in a crispy cone shape.
- Cooking spray: Helps to crisp the tortilla edges beautifully in the oven.
- 3 green onions (thinly sliced): For a fresh, mild onion garnish that adds color and a little crunch.
- Salsa, guacamole, sour cream: Essential dipping sauces to complement the rich, cheesy goodness.
How to Make Blooming Chicken Quesadilla Ring Recipe
Step 1: Prepare the Sautéed Vegetables
Start by heating olive oil in a skillet over medium heat, then add the thinly sliced onion and bell peppers. Sauté until they soften and turn golden brown, which usually takes about 5 to 6 minutes. This step is essential because the caramelized vegetables bring natural sweetness and depth to the filling, balancing the richness of the cheeses and chicken. Once done, set them aside to cool as you move on to the filling.
Step 2: Mix the Creamy Chicken Filling
In a large bowl, combine the room temperature cream cheese, sour cream (or Greek yogurt), and lime juice. Stir in the shredded mozzarella and cheddar cheeses along with the taco seasoning. Once these creamy ingredients are fully blended, gently fold in the shredded cooked chicken and the cooled sautéed veggies. Take your time mixing to ensure every bite will have an even amount of flavor and texture. This filling is what makes your Blooming Chicken Quesadilla Ring Recipe irresistibly creamy and flavorful.
Step 3: Prepare the Tortilla Cones
Slice each of the 12 flour tortillas in half. Then, carefully spoon about 1.5 to 2 tablespoons of the chicken filling onto each tortilla half, spreading it evenly but leaving a small border around the edges. Roll each filled tortilla half into a tight cone shape, being careful not to squeeze too hard to avoid the filling spilling out. These cones will build the beautiful layers of your quesadilla ring.
Step 4: Assemble the Quesadilla Ring
Place a small round bowl or similar object in the center of a lined baking sheet to serve as a guide. Arrange half of the tortilla cones around the bowl with their pointed ends touching it to form the base ring. Sprinkle half of the remaining shredded cheddar and mozzarella cheese over this bottom layer for extra cheesy goodness. Next, layer the remaining cones on top and finish with the rest of the shredded cheeses. Remove the bowl so you’re left with a cohesive, blooming ring shape.
Step 5: Bake Until Crispy and Melty
Lightly spray or brush the edges of the tortilla cones with cooking spray to help them crisp up to golden perfection. Bake the ring on the middle rack of a preheated 375℉ oven for 15 to 20 minutes. You’ll know it’s ready when the cheese is bubbling and melted throughout, and the tortilla edges turn irresistibly crispy. Carefully transfer your beautiful Blooming Chicken Quesadilla Ring Recipe onto a platter, ready for garnishing and serving.
How to Serve Blooming Chicken Quesadilla Ring Recipe

Garnishes
Adding a sprinkle of thinly sliced green onions on top brings fresh color and a mild onion flavor that contrasts beautifully with the cheese and chicken. You can also add a bit of chopped cilantro if you’re feeling adventurous. These final touches not only brighten the dish but make it look gourmet and inviting.
Side Dishes
This quesadilla ring shines on its own with dipping sauces like salsa, guacamole, and sour cream placed right in the center for easy access. For a fuller meal, consider serving with a fresh garden salad or Mexican street corn salad. The crisp veggies and smoky, tangy flavors of these sides complement the cheesy ring and enhance the overall experience.
Creative Ways to Present
For a festive touch, bake the ring on a colorful serving platter and arrange the dipping bowls centrally to mimic a blossoming flower with petals. You can even incorporate other dips like chipotle mayo or queso dip to add layers of flavor. If serving at a party, label the dips and garnishes so guests can mix and match to their liking, turning your Blooming Chicken Quesadilla Ring Recipe into an interactive centerpiece everyone will remember.
Make Ahead and Storage
Storing Leftovers
After enjoying your quesadilla ring, wrap any leftovers tightly in plastic wrap or store in an airtight container. Refrigerate within two hours of baking to keep it fresh. Properly stored, it will stay tasty for up to 3 days, making it perfect for quick lunches or snacks.
Freezing
If you want to prepare the Blooming Chicken Quesadilla Ring Recipe in advance, it freezes well before baking. Assemble the ring on a baking tray, cover it tightly with foil, and freeze for up to 1 month. When ready, bake it straight from frozen—just add extra baking time and check until it’s bubbly and heated through.
Reheating
To reheat leftover quesadilla ring, place it in a preheated 350℉ oven for 10 to 15 minutes or until warmed through and the tortillas regain crispness. Avoid microwaving as it can make the tortillas soggy and less appealing. A toaster oven works great for smaller portions and helps keep the layers delightful and crispy.
FAQs
Can I use corn tortillas instead of flour tortillas?
Flour tortillas are preferred for this recipe because they are more flexible and sturdy, which helps maintain the cone shape without cracking. Corn tortillas tend to be more fragile and may break during rolling or baking.
What can I substitute for the taco seasoning?
If you don’t have pre-made taco seasoning, you can mix your own using chili powder, cumin, paprika, garlic powder, onion powder, oregano, salt, and pepper. This allows you to control the spice level and customize the flavors to your liking.
Is it possible to make this vegetarian?
Absolutely! Replace the shredded chicken with cooked black beans, corn, sautéed mushrooms, or even a mixture of roasted veggies. Adjust the taco seasoning and cheese quantities to taste for a delicious vegetarian version of the Blooming Chicken Quesadilla Ring Recipe.
How do I prevent the filling from leaking out of the cones?
Make sure not to overfill the tortillas and roll them tightly but gently so the filling stays inside. Leaving a small border around the edges when spreading the filling helps seal the cones better. Also, chilling the filling slightly before rolling can make it less runny.
Can I prepare the filling a day ahead?
Yes, preparing the filling a day ahead lets the flavors meld beautifully. Keep it covered and refrigerated until assembly. Bring it to room temperature before filling the tortillas to make rolling easier and ensure even baking.
Final Thoughts
If you’re looking to wow your friends or family with something both delicious and visually stunning, the Blooming Chicken Quesadilla Ring Recipe is your golden ticket. It combines familiar, comforting flavors with a fun presentation that’s sure to spark smiles and second helpings. Trust me, once you try this, it will quickly become one of your all-time favorite recipes to make again and again. Don’t wait to bring a little blooming magic to your table today!
Print
Blooming Chicken Quesadilla Ring Recipe
- Prep Time: 15 minutes
- Cook Time: 20 minutes
- Total Time: 35 minutes
- Yield: 24 servings
- Category: Appetizer
- Method: Baking
- Cuisine: Mexican-American
Description
This Blooming Chicken Quesadilla Ring is a fun and flavorful appetizer or party dish that combines sautéed bell peppers and onions with a creamy, cheesy chicken filling wrapped in crispy flour tortillas. Baked to golden perfection, this impressive ring is perfect for sharing, served alongside salsa, guacamole, and sour cream for dipping.
Ingredients
Vegetables
- 1 medium onion, thinly sliced
- 2 bell peppers (red, yellow, green, or orange), sliced
- 3 green onions, thinly sliced (for garnish)
Chicken Filling
- 8 ounces cream cheese, room temperature (1 brick, 250 grams)
- ¼ cup sour cream or plain Greek yogurt
- 1 tbsp lime juice
- ¼ cup shredded mozzarella cheese
- ¼ cup shredded cheddar cheese
- 1 ½ tbsp taco seasoning
- 3 cups cooked shredded chicken (rotisserie or homemade)
Assembly
- 12 medium flour tortillas (10″ – 12″ size), sliced in half
- ¼ cup shredded cheddar cheese (extra for topping)
- ¼ cup shredded mozzarella cheese (extra for topping)
- 2 tablespoons olive oil
- Cooking spray or additional oil for brushing
For Serving
- Salsa
- Guacamole
- Sour cream
Instructions
- Preheat Oven: Preheat your oven to 375℉ and line a large baking sheet or pizza tray with parchment paper or greased foil to prevent sticking.
- Sauté Vegetables: Heat 2 tablespoons of olive oil in a large frying pan or skillet over medium heat. Add the thinly sliced onion and bell peppers, sautéing until softened and golden brown, about 5-6 minutes. Stir often to prevent burning. Remove from heat and set aside to cool.
- Prepare Chicken Filling: In a large bowl, combine the room-temperature cream cheese, sour cream (or Greek yogurt), lime juice, shredded mozzarella, shredded cheddar, and taco seasoning. Mix until smooth and evenly blended.
- Combine Ingredients: Add the shredded cooked chicken along with the cooled sautéed onions and peppers to the cheese mixture. Gently stir until everything is incorporated evenly. Set aside.
- Prepare Tortillas: Slice each of the 12 flour tortillas in half, creating 24 semicircles for rolling.
- Fill Tortillas: Evenly distribute the chicken filling onto each tortilla half, using about 1.5 to 2 tablespoons per piece. Spread the filling leaving a small border around the edges to prevent overflow when rolling.
- Roll Tortillas: Carefully roll each tortilla half into a cone shape. Roll them tight enough to hold their shape but not so tight that the filling spills out.
- Arrange Base Layer: Place a small round bowl in the center of the baking sheet. Arrange half of the rolled cones standing upright around the bowl, with the pointed ends touching the bowl, forming a circular base.
- Add Cheese Layer: Sprinkle half of the reserved shredded cheddar and mozzarella cheeses evenly over the base layer of cones.
- Arrange Second Layer: Place the remaining rolled cones on top of the base layer to form a second ring. Sprinkle the remaining cheddar and mozzarella cheese over this top layer, then carefully remove the bowl.
- Prepare for Baking: Lightly spray or brush the edges of the tortillas with cooking spray or a little oil to help crisp the edges.
- Bake: Bake the assembled quesadilla ring on the middle rack of the oven for 15-20 minutes or until the cheese is melted and the tortilla edges are golden crispy.
- Garnish and Serve: Carefully transfer the quesadilla ring to a serving platter. Optionally, sprinkle the thinly sliced green onions over the top as garnish.
- Serve with Dips: Place a small bowl of salsa in the center of the ring and serve with additional bowls of sour cream and guacamole on the side for dipping. Enjoy this festive and delicious dish!
Notes
- Use rotisserie chicken for a quick shortcut, or homemade cooked shredded chicken works equally well.
- The filling can be made ahead and refrigerated to save time on serving day.
- If you prefer a spicier ring, add extra taco seasoning or some chopped jalapeños to the filling.
- Ensure tortillas are not overfilled to maintain their shape while rolling and baking.
- Customize toppings by adding fresh cilantro or diced tomatoes after baking for added freshness.


