
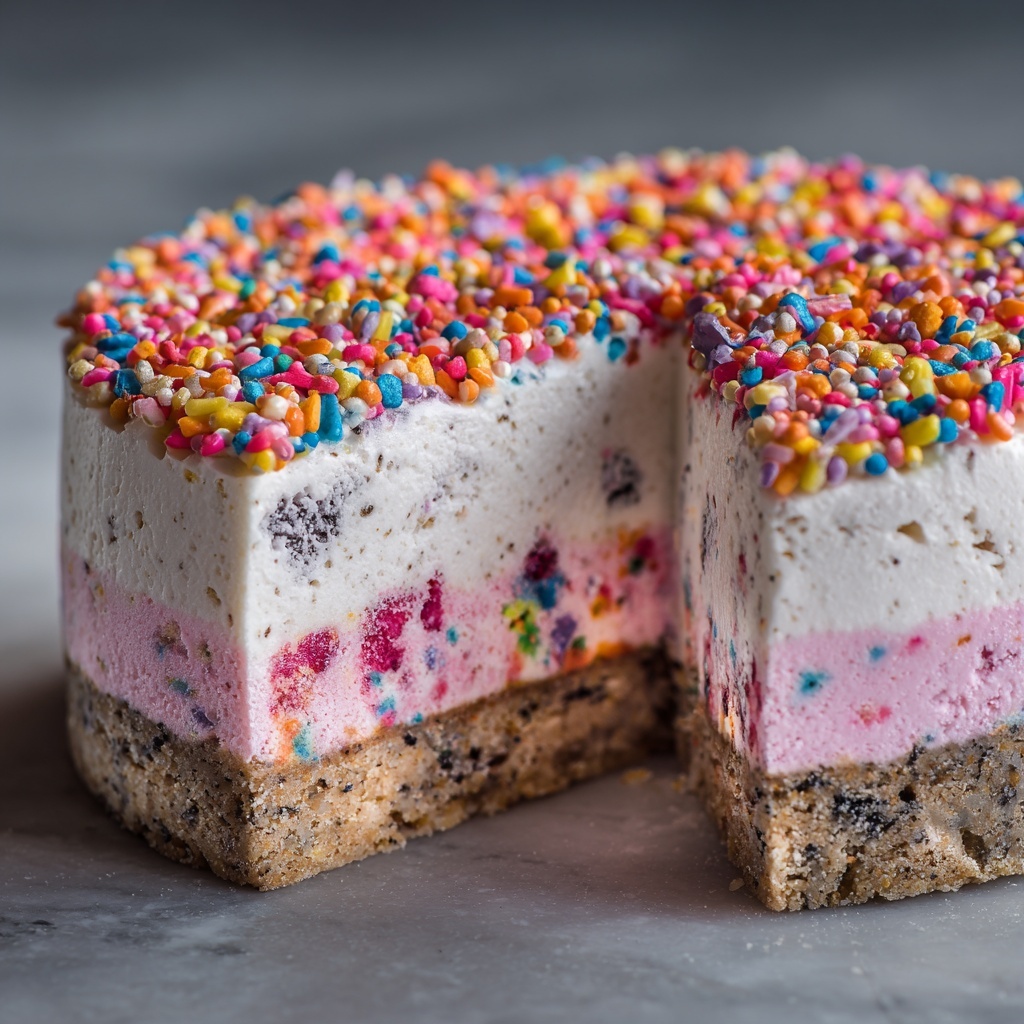
If you’re looking for a celebration-worthy dessert that brings an explosion of color and flavor with every bite, the Funfetti Ice Cream Cake Recipe is exactly what you need. This cake combines the nostalgic charm of confetti sprinkles with luscious strawberry ice cream and a crunchy chocolate cookie crust, layered with fluffy whipped cream and topped with vibrant candy for an irresistible treat. It’s the perfect blend of textures and sweetness, guaranteed to brighten any gathering and become an instant favorite for kids and adults alike.
Ingredients You’ll Need
This Funfetti Ice Cream Cake Recipe keeps things delightfully simple, with ingredients that each play an essential role in building its colorful, creamy, and crunchy layers. Every component was chosen to elevate the taste and texture, turning a straightforward dessert into a show-stopping centerpiece.
- Chocolate cookie crumbs: Provide a rich, crunchy base that contrasts beautifully with the creamy layers above.
- Melted butter: Binds the cookie crumbs together to form a sturdy crust that holds its shape.
- Strawberry ice cream: The star flavor that adds fruity sweetness and creamy softness.
- Whipped cream: Lightens the texture, adds creaminess, and helps fold in sprinkles for that funfetti look.
- Rainbow sprinkles: Bring bursts of color and a festive vibe throughout the ice cream layer and topping.
- Nerds candy (or your favorite colorful candies): Add an unexpected crunch and a whimsical pop of flavor on the final layer.
How to Make Funfetti Ice Cream Cake Recipe
Step 1: Prepare the Crust
Start by mixing the chocolate cookie crumbs with the melted butter in a medium bowl until they’re combined perfectly, like sandy soil on a summer day. Press this mixture firmly into the bottom of a 9-inch springform pan to form your crunchy crust base. Pop it into the freezer for about 10 to 15 minutes to set up nicely—this step is key for holding all those delicious layers together later on.
Step 2: Make the Ice Cream Layer
Now for the fun part! Take your strawberry ice cream out of the freezer and let it soften just enough to be spreadable, but not melted—this gives you that silky texture without becoming a mess. In a large bowl, fold in half a cup of whipped cream to lighten the ice cream, then sprinkle in half a cup of rainbow sprinkles for that unmistakable funfetti magic. Spread this colorful mixture evenly over your chilled cookie crust, smoothing it out to build that luscious layer.
Step 3: Add the Topping
Time to make this cake truly sparkle! Spread the remaining whipped cream over the ice cream layer with gentle, sweeping motions. Then get creative by sprinkling extra rainbow sprinkles and Nerds candy right on top. These candies not only enhance the colors but also add a delightful crunch that will surprise your taste buds with every bite.
Step 4: Freeze and Set
Place the entire cake in the freezer and let it chill for at least four hours, or until it is completely firm. This wait can be tough, but it’s essential to get those perfect, clean slices and that dream-like texture everyone will rave about.
Step 5: Serve and Enjoy
Once fully set, carefully release your cake from the springform pan and slice it into generous servings. Each slice will showcase layers of chocolate crust, creamy strawberry-funfetti bliss, and a colorful candy topping that’s as inviting as a party on a plate.
How to Serve Funfetti Ice Cream Cake Recipe

Garnishes
To amp up the joy, garnish slices with a few extra sprinkles or a handful of Nerds candy on the side, adding a playful crunch right before serving. Fresh berries or a drizzle of chocolate sauce can also complement this cake beautifully, elevating the sensory experience with extra color and flavor contrasts.
Side Dishes
This cake shines as the star dessert, so keep side dishes light and simple—perhaps a fresh fruit salad or a scoop of vanilla bean ice cream. These mellow accompaniments balance the sweetness and celebrate the cake’s vibrant, festive nature without overwhelming your palate.
Creative Ways to Present
For a truly unforgettable occasion, serve your Funfetti Ice Cream Cake Recipe on a bright cake stand surrounded by party hats and confetti. You might also slice it into individual parfait glasses layered with extra sprinkles and whipped cream for a chic twist. Another charming idea is to top each slice with a whimsical candle or edible glitter to highlight the celebration spirit.
Make Ahead and Storage
Storing Leftovers
Leftovers? Lucky you! Keep them in an airtight container to avoid freezer burn and maintain the cake’s textures. Stored this way, the cake stays fresh and delicious for up to 3 days, making it a perfect treat to enjoy long after the party ends.
Freezing
You can freeze the entire cake for up to a month without losing its charm. Just cover it tightly with plastic wrap and foil to protect against freezer odors and ice crystals. When ready to serve again, allow it to thaw in the fridge for a couple of hours before slicing for that just-right scoopable texture.
Reheating
Since this is an ice cream-based dessert, reheating is not recommended. Instead, just let frozen slices soften slightly at room temperature for about 10 minutes to regain their perfect scoopability without melting completely. This keeps the cake’s layers intact and enjoyable.
FAQs
Can I use a different ice cream flavor?
Absolutely! While strawberry adds a lovely fruity twist, vanilla, chocolate, or even birthday cake-flavored ice cream would be fantastic alternatives that keep the funfetti spirit alive. Just choose something creamy and scoopable.
What if I don’t have Nerds candy? What can I substitute?
No worries! You can swap Nerds with any small, colorful candy like mini M&Ms, Skittles, or even crushed candy canes for a seasonal twist. The key is to keep the festive crunch and bright colors.
Do I have to use a springform pan?
Using a springform pan makes the removal of the cake easier, but you can also use a regular cake pan lined with parchment paper. Just be extra gentle when unmolding so your layers stay intact.
Can I make this cake vegan or dairy-free?
Yes! Use dairy-free ice cream and whipped topping alternatives, and opt for vegan cookie crumbs and butter substitutes. The recipe’s fun and colors can absolutely remain, even with these adjustments.
How far in advance can I make the Funfetti Ice Cream Cake Recipe?
You can prepare the cake up to two days in advance and store it in the freezer. This makes it a great choice for easy entertaining without last-minute stress.
Final Thoughts
This Funfetti Ice Cream Cake Recipe is like a party in dessert form—joyful, colorful, and utterly delicious. Whether you’re celebrating a birthday, a special occasion, or just craving something fun and sweet, this cake delivers every time. I can’t wait for you to try it and see the bright smiles it brings around your table!
Print
Funfetti Ice Cream Cake Recipe
- Prep Time: 20 minutes
- Cook Time: 0 minutes
- Total Time: 4 hours 20 minutes
- Yield: 8 servings
- Category: Dessert
- Method: No-Cook
- Cuisine: American
Description
This Funfetti Ice Cream Cake is a delightful, no-bake dessert perfect for celebrations and summer treats. Featuring a crunchy chocolate cookie crumb crust, a creamy strawberry ice cream layer mixed with whipped cream and colorful sprinkles, and topped with more whipped cream and vibrant candies, it’s a festive and fun dessert that’s as visually appealing as it is delicious.
Ingredients
Crust
- 2 cups chocolate cookie crumbs
- 1/4 cup melted butter
Ice Cream Layer
- 4 cups strawberry ice cream
- 1/2 cup whipped cream
- 1/2 cup rainbow sprinkles
Topping
- 1 cup whipped cream
- 1/4 cup rainbow sprinkles
- 1/4 cup Nerds candy (or your favorite colorful candies)
Instructions
- Prepare the crust: Mix the chocolate cookie crumbs with melted butter in a medium bowl. Press the mixture firmly into the bottom of a 9-inch springform pan and place in the freezer for 10 to 15 minutes to set.
- Make the ice cream layer: In a large bowl, soften the strawberry ice cream until it is spreadable but not melted. Gently fold in 1/2 cup whipped cream and 1/2 cup rainbow sprinkles. Spread this mixture evenly over the chilled crust in the springform pan.
- Add the topping: Evenly spread the remaining 1/2 cup of whipped cream over the ice cream layer. Sprinkle the top with additional rainbow sprinkles and Nerds candy to create a festive look.
- Freeze the cake: Place the assembled cake in the freezer and freeze for at least 4 hours, or until fully set and firm.
- Serve: Carefully remove the cake from the springform pan and slice into 8 servings. Serve immediately for a refreshing and colorful dessert experience.
Notes
- Make sure the ice cream is softened enough to spread easily but not melted to maintain layer structure.
- Use a springform pan for easy removal of the cake without damaging the layers.
- Feel free to substitute strawberry ice cream with other flavors to customize your cake.
- The cake must be frozen completely before slicing to ensure clean cuts and keep the layers intact.
- Can be stored in the freezer for up to 3 days while maintaining quality.


